Plaster walls show up in many older Florida homes, from historic bungalows in established neighborhoods to mid-century block houses where plaster was troweled straight onto the masonry. Plaster is hard, durable and quiet, but it is also rigid. When the house moves even slightly, plaster cracks rather than flexes.
Most of those cracks are cosmetic and very repairable. This guide explains why they happen, how to read them, and how to repair plaster cracks so they stay closed.
Why Plaster Cracks in Florida
- Temperature and humidity swings. Homes move between AC-cooled interiors and hot, humid exteriors, and between dry winter air and soaked summer air. Wood lath and framing expand and contract.
- Settling. Slab-on-grade homes on sandy soil settle over time, which shows up as cracks at the weakest points, above doors and windows.
- Moisture. Leaks from roofs, windows or plumbing soften plaster and break its bond to lath or block.
- Vibration and impact. Slamming doors, nearby construction and storms can all contribute.
- Original workmanship. Thin coats or poorly prepared surfaces crack sooner.
Reading the Crack
Not every crack means the same thing. Before repairing, look closely at its shape and behavior.
- Hairline cracks that are fine and short are usually surface shrinkage or minor movement. They are the easiest to fix.
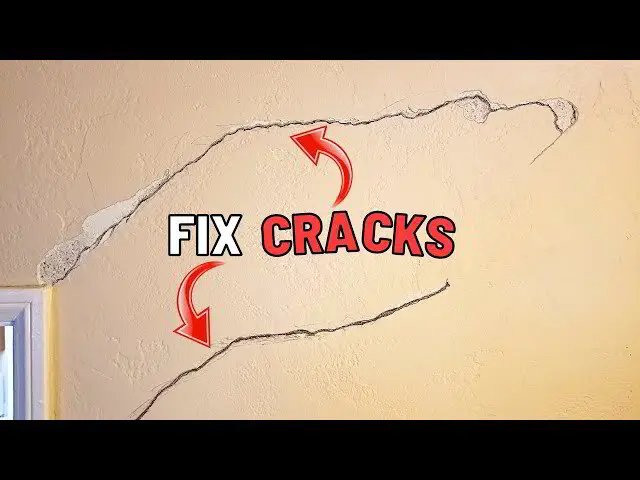
- Diagonal cracks from door and window corners are stress cracks from settling or framing movement. They are common and repairable, but need tape to stay closed.
- Spiderweb or map cracking across an area often means the finish coat is weak or the plaster is losing its bond.
- Wide cracks or cracks with one side higher than the other suggest the plaster has come loose from the lath.
- Cracks that reopen after repair point to ongoing movement or moisture that has to be addressed first.
If a crack is wider than about a quarter inch, is growing, follows a stair-step pattern on a block wall, or comes with sticking doors, have it looked at before cosmetic repair.
Tools and Materials
- Utility knife or a crack-opening tool
- Shop vacuum and a stiff brush
- Spray bottle with water
- Bonding agent for plaster
- Setting-type joint compound or a patching plaster
- Fiberglass mesh tape or paper tape
- Plaster washers and screws for loose areas
- Knives in a few widths, a sanding sponge and primer
- Dust mask and eye protection
Step-by-Step Repair
Step 1: Check for loose plaster
Press gently along both sides of the crack. If the plaster moves, it has lost its grip on the lath. Drill pilot holes a few inches from the crack and fasten plaster washers with screws into the lath or framing to pull it back tight. Do not over-tighten.
Step 2: Open and clean the crack
Use the knife to widen the crack slightly into a shallow V. This gives the filler something to grip. Brush and vacuum out all dust and loose bits.
Step 3: Apply a bonding agent
Old plaster is very absorbent and pulls moisture out of new material too fast, which causes weak, crumbly repairs. Brush on a bonding agent along the crack and let it get tacky according to the product directions.
Step 4: Fill the crack
Press setting-type compound or patching plaster firmly into the V. Fill it flush or slightly under.
Step 5: Bridge it with tape
For anything beyond a fine hairline, embed mesh or paper tape over the filled crack in a thin coat of compound. This stops the crack from telegraphing back through.
Step 6: Finish coats
Apply two or three thin coats, each wider than the last, feathering several inches past the crack. Let each coat set and dry. In humid weather, that takes longer, so run the AC.
Step 7: Sand, prime and paint
Sand lightly, wipe off the dust, prime the repair and paint the whole wall section so it blends in.
Preventing New Cracks
- Keep indoor humidity steady by running the AC consistently rather than shutting it off for long periods
- Use bathroom and kitchen exhaust fans
- Fix roof, window and plumbing leaks promptly
- Add door stops so doors do not slam into walls
- Inspect walls once or twice a year and fix small cracks before they spread
When to Call a Professional
- Cracks wider than about a quarter inch, or that keep widening
- Large areas of loose or bulging plaster
- Cracks with water stains or soft plaster around them
- Cracks that line up with exterior stucco cracks on block walls
- Ornamental plaster, curved walls or textured finishes that must be matched
In older homes, remember that paint layers may contain lead if the house was built before 1978. Test before sanding large areas.
The Patch Guyz have a dedicated plaster specialist and handle plaster wall and ceiling repairs across West Central Florida. If you are weighing whether to keep your plaster at all, see our guide on plaster repair versus drywall replacement. For cracks in drywall rather than plaster, our seam and crack repair service is the better fit. Text a photo to 727-242-8500 for a free virtual estimate, usually within the hour.