
Plaster & Lath Specialists
Plaster Wall Repair in Tampa & West Central Florida
Plaster is harder, denser and less forgiving than drywall, so a quick skim of joint compound rarely survives. We re-anchor loose plaster, rebuild missing coats with bonding agents and setting materials, and match the original finish on walls and ceilings in older Tampa Bay homes.
- Veteran-owned
- Background-checked techs
- 1-year written warranty
- Text-a-photo quotes
Free estimate in about an hour
- Text a photo to 727-242-8500
- Written quote = final price
- HEPA dust control on every job
- Walkthrough before you pay
How plaster walls are built, and why that changes the repair
Traditional plaster goes on in layers. A rough scratch coat is pushed against the wall base, a thicker brown coat builds it out flat, and a thin finish coat gives the final smooth or sand-textured face. The material sets hard, which is why plaster rooms feel solid and quiet, and also why the surface cannot flex the way gypsum board can.
What the plaster is attached to matters as much as the plaster itself. In wood-lath construction, wet plaster squeezes through the gaps between narrow wooden strips and curls over the back, forming keys that lock the coats in place. When those keys snap, from age, moisture or vibration, the plaster stays in one piece but lets go of the wall, and you get a bulge, a hollow sound or a ceiling that dips. Expanded metal lath behaves differently: it rusts if it stays damp, and the rust stains bleed through paint. Mid-century houses often used gypsum rock lath, small boards with a plaster skin. Many older Florida houses have plaster troweled straight onto concrete block, which almost never sags but cracks along mortar lines and around openings.
Our plaster specialist, Danny, starts every visit by working out which system is in your wall, because the anchoring method, the bonding agent and the fill material all depend on it.
What breaks down plaster in a Florida house
Humidity cycles
Lime and gypsum plaster absorb moisture and release it again. Years of humid summers and air-conditioned interiors loosen the bond between coats, and the finish starts to flake or craze.
Hidden leaks
A slow roof drip or a sweating air handler soaks the ceiling from above. Gypsum plaster softens when wet, wood lath swells and shrinks, and the keys give way first.
Movement and settling
Seasonal soil movement, heavy doors slamming and nearby construction all flex the framing. Rigid plaster responds with cracks that radiate from door and window corners.
Fixture and wiring changes
Every new outlet, light or speaker cut into plaster risks cracking the surrounding area or breaking keys well beyond the hole you can see.
Failed earlier patches
Lightweight spackle or all-purpose mud over old plaster shrinks, loses adhesion on the smooth lime face and outlines itself as a ring or a raised edge a season later.
Paint build-up
Decades of paint layers can peel in sheets and pull the finish coat with them, especially where oil paint sits under modern latex.
Hairline cracks vs structural cracks
Not every crack means the same thing, and we tell you plainly which kind you have.
Hairline and map cracks live in the finish coat. They wander, branch like a road map, stay tight and do not have one side sitting higher than the other. They are cosmetic: we open them slightly, consolidate the edges, bridge them with a mesh or fiberglass tape set in a hardening compound, and re-skim so the line does not telegraph back through the paint.
Cracks that run diagonally from door and window corners, that are wide enough to catch a fingernail, that reopen after being filled, or where one side is proud of the other point to movement in the structure behind. We can stabilise and repair the plaster, but when the pattern suggests foundation or framing movement we will recommend you have a structural engineer or a qualified contractor look first. Patching over active movement only buys a few months.
A crack running straight along a ceiling with a slight sag beside it is usually a key failure rather than a structural problem, and it is one of the most common jobs we see in older homes.
Our plaster repair process, step by step
Sound out the damage
We tap and press across the area to find where plaster has delaminated from the lath or block. The repair boundary is set by what is loose, not by what is cracked on the surface.
Re-anchor what can be saved
Loose but intact plaster is drawn back to the framing with plaster washers and screws, or re-glued through small injection holes using a conservation-style adhesive, then left to cure before anything else happens.
Cut back and key the edges
Crumbling material is removed back to a sound edge, which we undercut slightly so the new fill locks in. Broken wood lath is replaced or bridged with metal lath.
Apply a bonding agent
Old plaster is thirsty and smooth. A bonding agent painted onto the edges and the base stops it pulling water out of the new material and gives the fill something to grip.
Build up base coats
Deeper repairs are filled in layers with setting-type patching plaster or hardening compound, each one scratched to accept the next, rather than one thick pass that would shrink and crack.
Finish and match
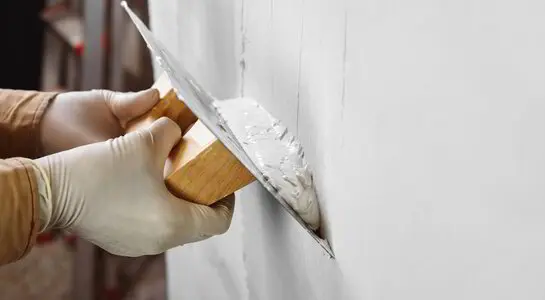
The final coat is troweled smooth or floated to match sand-finish plaster, feathered well past the patch, then primed with a primer suited to plaster so your paint goes on evenly.
Veneer plaster, drywall inserts or a full skim: choosing the right fix
Small holes and cracks are best repaired in plaster-compatible setting materials, keeping the wall a single hard, uniform surface.
When a larger section is missing, say where an old wall heater was removed or a ceiling area collapsed after a leak, we often fit a piece of gypsum board shimmed so its face sits at the exact depth of the surrounding plaster, then tape and skim it. Done properly, the insert is invisible and far quicker to dry than rebuilding three coats by hand. Plain drywall mud on its own is the wrong tool for the transition; we use setting compounds and bonding agents where new meets old.
Veneer plaster over blue board is another option when a whole wall needs renewing. It gives a hard, abrasion-resistant finish closer to the original than painted drywall. For walls covered in a web of fine cracks, a full skim coat over a bonding primer and mesh often makes more sense than chasing each crack individually.
If you want the room's texture matched after the plaster is rebuilt, our texture matching service handles sand finishes and hand-troweled looks, and long cracks in drywall rooms elsewhere in the house fall under seam and crack repair.
Repair or replace your plaster?
Most plaster can be saved, and saving it keeps the character, sound-deadening and solidity of an older home. Here is how we weigh it:
Repair when the plaster is mostly attached, cracks are cosmetic and loose areas can be screwed or glued back.
Repair with an insert when a defined area is missing or crumbled but the surrounding wall is sound.
Skim the whole wall when crazing or old patch outlines cover most of the surface.
Consider replacement when a ceiling is sagging across most of the room, the lath is rotted from long-term leaks or the plaster is soft and powdery throughout.
Pause and test first in homes old enough to have lead-based paint, before anything is sanded or demolished. A simple test tells everyone what precautions are needed.
Preparing for your plaster repair and what to expect
Start by texting a photo of the damage to 727-242-8500. You will usually have a written quote within the hour, and that quote is the final price. Close-ups of cracks plus one wider shot of the wall help us judge whether it is surface damage or loose plaster.
Before we arrive, move furniture and wall hangings away from the work area, and tell us about any recent leaks, even ones already fixed. If a leak is still active, have it repaired first; plaster cannot be restored over a wet substrate.
We set up HEPA dust control, protect floors, and work in stages because setting materials need time between coats. Most small patches are finished in two to four hours, while larger repairs with texture and dry time usually run one to three days. We walk the result with you before payment, and the work carries our one-year written workmanship warranty. You can read more about how a visit runs on our what to expect page.
We repair plaster across Hillsborough, Pinellas, Polk, Manatee, Pasco and Sarasota counties. Homeowners in the city can start with our Tampa drywall and plaster contractors page, or browse everything we offer in the Hillsborough County service area.
Plaster Repair across West Central Florida
We provide this service in all six counties. Choose your area for local details.
- Plaster Repair in Pinellas County
- Plaster Repair in Polk County
- Plaster Repair in Manatee County
- Plaster Repair in Pasco County
- Hillsborough County drywall contractors
- Pinellas County drywall contractors
- Polk County drywall contractors
- Manatee County drywall contractors
- Pasco County drywall contractors
- Sarasota County drywall contractors
Frequently Asked Questions
Why does the spackle on my plaster wall keep cracking?
Ready-mixed spackle and lightweight joint compound shrink as they dry and have little grip on hard, smooth plaster. Usually the crack also sits over plaster that has lost its keys, so the wall keeps moving. A lasting fix re-anchors the loose plaster first, uses a bonding agent, and fills with setting-type material that hardens chemically instead of drying and shrinking.
Can you repair a sagging plaster ceiling without tearing it down?
Often, yes. If the plaster is still in one piece, we support it, draw it back to the joists with plaster washers and screws or adhesive, and then skim over the hardware. If it has cracked into loose slabs or the lath has rotted from a long leak, we remove that section and rebuild it with a flush insert.
Do you match old sand-finish or smooth troweled plaster?
Yes. Sand-finish plaster is floated to reproduce the gritty texture, and smooth plaster is hard-troweled and feathered wide so there is no ridge where the repair meets the original. We compare under raking light before priming so the patch does not show once painted.
Is plaster repair messier than drywall repair?
Cutting back loose plaster creates heavier debris than drywall, but HEPA dust control is standard on every job and we protect floors and furnishings before starting. Most of the dust comes from removal, so the more plaster we can re-anchor rather than demolish, the cleaner the job stays.
Do you only repair plaster in Tampa?
No. Although this page is listed under Hillsborough County, we repair plaster walls and ceilings throughout Hillsborough, Pinellas, Polk, Manatee, Pasco and Sarasota counties. Text a photo for a written quote and we will confirm scheduling for your address.
Keep exploring
Tell us about the damage
Send the details and a photo through the form and we reply with a written quote, usually within the hour. The quote is the final price.
- Free virtual estimate, no obligation
- Veteran-owned, background-checked technicians
- HEPA dust control on every job
- 1-year written workmanship warranty
Get Your Free Estimate Today
Fill in your details and we'll respond within the hour — often in minutes.
Prefer not to use the form? Text a photo to 727-242-8500 or call 1-877-728-2448.
Ready for a flawless repair?
Text a photo, call for a free estimate, or send the form. We serve Tampa, Clearwater, Lakeland, Bradenton, Sarasota and all of West Central Florida.
Or text a damage photo to 727-242-8500 for a written quote, usually within the hour.